
Course Guide: Treehouz, Ridgedale, MO
Posted by mleefry

Doglegger Emily by 19’s basket at Treehouz

Some of the houses at Treehouz, including a treehouse, the Journey Post, and the trophies for Journey Post’s First Stop.
About three weeks ago I made my first visit to Branson Cedars Resort, home of Treehouz Disc Golf Course and The Journey Post. The occasion was Journey Post’s First Stop Presented by Prodigy Discs. I chose not to play in the tournament for a few reasons, including the difficulty/length of the course, which I think was a good decision at the time. I’ll be ready for it before I know it though! Anyway, since I didn’t get to play very many of the holes myself, my analysis is based mostly on observation of the Advanced division players, specifically my boyfriend Adam Morrison, and our friend Brad Bullerdieck from Columbia. I also had the pleasure of following the Advanced Grandmasters card for a few holes, and of watching the Pros from afar!

Will Schusterick putting on Hole 16. Paige Pierce throwing a warm up drive on Hole 18.

Ring of Fire on Hole 19 during the First Stop
So, a little background on the course. Treehouz is located in Ridgedale, Missouri, between Branson and the border to Arkansas. Its 19-hole course’s par is 60, and is a total of 7,407 feet in length. The course uses DISCatcher baskets and has multiple tees and placements on some holes. Treehouz is pay-to-play: $5 per person for a full day.
Journey Post owner Jaysin Smith designed Treehouz in 2012. Smith said his vision while designing was to create a, “championship level course with a lot of elevation change and a mixture of wooded holes, open holes, and hazard holes; as well as long and short holes.” When asked what other courses inspired him, he referred to Sioux Passage in St. Louis and Hole 1 on Water Works in Kansas City, in terms of their length and elevation changes. (These courses are particularly iconic for Missourians.) He also wanted to incorporate the difficulty of water hazards as seen at Fountain Hills in Arizona. After seeing this course, I’d say this course definitely lives up to his expectations. As if this isn’t enough, the resort is considering adding more holes, pin placements, and tee pads to make the course larger and more accessible for players of all skill levels.
Just for comparing holes and getting a sense of direction, check out this map of the course from Disc Golf Course Review: http://www.dgcoursereview.com/course_files/5830/993ec582.pdf
Now that we have the basics out of the way, let’s get to the pictures!

1. Your disc’s placement in the fairway is critical to playing this hole well. If your disc lands too far to the left, or too short or long, you have to make a difficult upshot down to the basket on slanted ground. If it is too far right, you end up in the woods. Even worse, I saw a few players land their discs in the fairway, but they ended up rolling into the valley on the right!

2. Knowing how your discs behave in the wind and with large elevation changes helps significantly on this hole. It’s challenging from both tees. The view definitely makes it one of the favorite and most iconic holes on the course.

3. Beware of this hole’s water hazard, sloped terrain, and tree placement. Although this is one of the shorter holes on this course at 337’, it can be deceivingly difficult.

4. This hole is all about placement. With the water hazard so close to the end of the hole, you must decide from the tee where you think you’ll have the most success with an upshot. Landing near the water’s edge gives you a straight shot at the basket, but possibly an intimidating putt toward the water. Landing to the right (the path is not OB) is more technical with the trees and the slope, and may lead to a more difficult hyzer upshot because of the possibility of skipping toward the water. However, this positioning will probably allow you to land you closer to the basket and prevent you from putting toward water.

5. You wouldn’t know it from the tee sign alone, but it’s obvious what the challenge is from seeing the terrain of this hole. Be sure to know how your disc flies and how it lands—or you’ll be rolling down the hill!

6. This hole’s hard turn to the left is sharper than it appears from the tee—the sign gives insight into the degree to which your flight path should curve. If you’re too narrow, you’ll hit the trees to the left. If you’re too wide, it may hit the trees and not come back in bounds. Trees surround the basket, and the green slopes toward the water.

7. This hole combines a water hazard, sloped landing zones, and guardian trees to make it technical. The lower left picture is of the placement designated by the yellow circle on the right and is represented by the basket on the tee sign illustration. The lower right picture is of the left placement, which is not shown on the sign.

7B. Hole 7B was temporarily used for Journey Post’s First Stop Tournament. Orange flags on the edge of a putting green designated the tee. The fairway curves to the right and slopes upward. Past the curve, trees line the fairway.

8. Hole 8 is characterized by its steep uphill fairway and dense trees. I saw several birdies on this hole during the tournament. I took a 4 using only a midrange when I snuck this hole in between rounds.

9. The slope of this fairway in addition to the trees makes the line of your shot very important. When preparing to throw, consider how throwing uphill will affect the stability of your disc, and how your disc will roll when it lands.

10. The biggest challenge on this hole is the combination of the OB on both sides of the fairway and the trees that surround the basket. Accuracy in your line is key!

11. Hole 11 is also characterized by having OB on both sides of the fairway. The basket is located on a putting green with a pretty steep hill behind it (the bottom picture is taken from behind). Be sure your upshot doesn’t roll!

12. The gap to hit on this hole is very narrow and makes for a difficult shot (especially for righties). From the tee, the basket is barely visible, as illustrated in the center photo. Because you have to step off to the left of the pad, as seen in the far right photo, it can be difficult to judge the angle of the throw. If you’re unlucky enough to hit a tree or an “invisibranch,” you could be in trouble if your disc decides to roll. Off to the right of the fairway is a fairly steep hill covered in trees—not a place you want to end up!

13. I think the photo for this hole really says it all. The fairway is pretty narrow with pretty dense trees on both sides and behind the basket. The ground slopes a bit to the right, but not enough to make a significant difference on how this hole plays out.

14. Some call it a fishhook, Adam says it’s a “P” for Prodigy, and I say it’s a question mark for “Where is the basket?” when you’re standing on the tee. From the tee, the fairway looks like a hallway that goes all the way to the tee for hole 15. The trees get less dense 200 feet or so down and to the right of the fairway where the basket placement is. The ground is sloped, so make sure your discs aren’t going to roll!

15. I think the tee sign and the photos of this hole really speak for themselves. I’ll let you figure this one out.
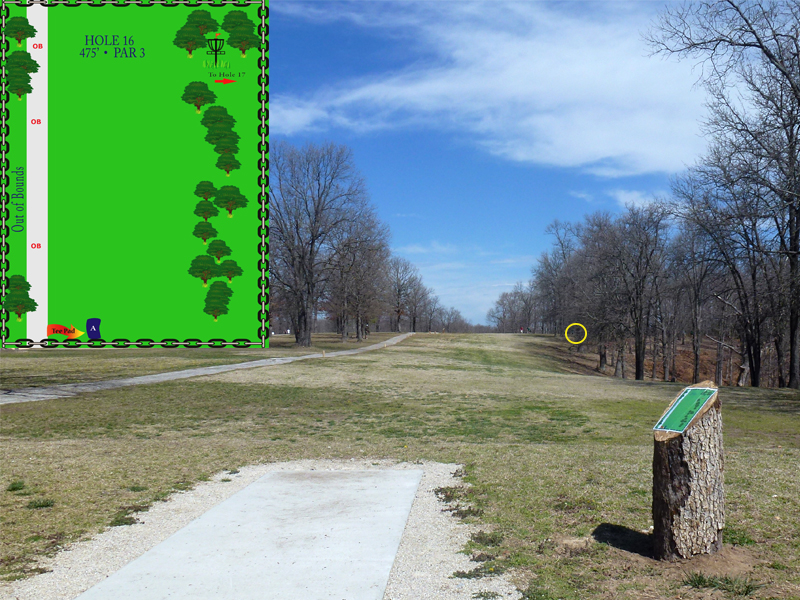
16. Because of the OB on the left, righties need to be especially aware of the distance, wind, and the line you’re throwing your disc on. Knowing that your disc is prone to rolling on this smooth terrain may impact your disc selection!

17. This tight shot is especially technical because the fairway is uphill. This means your disc is going to be more stable.

18. In most cases, the OB should not make much of a difference on this hole if your disc goes where you intend. If you have the arm for it, you’ll want to make sure you get across the valley in the fairway. The closer you are, the more level you’ll be with the basket.

19. My advice for this hole is similar to hole 18. I would recommend trying these two holes as well as hole 2 out before playing them competitively just to get a feel for how the elevation changes effect how far you are able to throw. Additionally, you’ll want to get a feel for how your disc acts when it lands on the putting greens.
Course Guide: Jones West, Emporia, KS
Posted by mleefry
I’m really excited to share with you all the first of many photo-based course guides I plan on creating. I got the idea to start these when I realized that many members of the Dogleg community would not have the opportunity to practice the courses for Amateur Worlds until they arrived for the competition. Since Columbia (my hometown) is only 3.5 hours away and St. Louis (where I go to school) is only 5 hours away, I figured I was in a great position to help non-Midwestern disc golfers prepare for such a big event.
But, making a trip to Emporia was easier said than done. I sat on the idea for a month or two before Adam and I decided Valentine’s Day weekend would be the best time for us to take a disc golf trip. (Jealous? Refer to my last post: Love Is In The Air.) After a few near-death experiences caused by our failure to realize that some highways outside of Kansas City were icy, we made it safely to my first Emporia course: Jones West.
According to Disc Golf Course Review, Jones West, an 18-hole par-54 course, was established in 1989. The topography has some gentle hills, but is mostly flat. After all, it is Kansas we’re talking about! Trees—ranging from broad and branchy evergreens to skinny deciduous trunks—definitely factor into the strategy on this course, but not to the degree that it creates the feeling of playing in the woods. There are two ponds on the course, which create water hazards on 5 holes. Each hole has two different pin placements, red and blue, for the Mach 3 baskets. (For more info: http://www.dgcoursereview.com/course.php?id=1403)
As with most other Midwestern courses, the difficulty will vary with different weather and seasonal conditions. Wind wasn’t a huge factor the day we played, but I’ve heard it can be pretty extreme in Emporia (there was a tornado nearby during the weekend of the Glass Blown Open last year). The seasonal changes to the course will be a little more predictable. Just like anywhere else, in spring and summer trees will be thicker and have more leaves; in the fall and winter they’ll thin out and leave more gaps. The size of the ponds will change depending on precipitation in the days and weeks before. This will cause the water hazards to be more or less extreme on some holes. (The water was pretty low when I took these pictures; there was a drought last summer, and the heavy snow didn’t hit until a few weeks later.)
After playing the course, we swung by the Dynamic Discs store and talked with Adam Searle. He said that all of the courses in the area will be getting new tee signs before hosting Am Worlds. (The ones they have at Jones West now are pretty nice, but several have been vandalized. I edited most of the vandalism out in my pictures.) As of my correspondence with Dynamic Discs on Thursday, I learned that Jones West will not be used for the Glass Blown Open this year, but it will be for Am Worlds. They are in the process of finalizing which pin placements will be used for the tournament.

Now that I have all the details out of the way, enjoy the pictures!

Hole #1: We played this hole in the red placement. For those of you who have played at Jones before, you may notice that the giant tree in the middle of the fairway (the one on the tee sign) is no longer there, which makes the hole play out a lot easier. Water shouldn’t affect you on this hole, even though it can be seen on the tee sign. Scores: Emily 4, Adam 3

Hole #2: We played this hole in the red placement. The road on the left is OB. Scores: Emily 5, Adam 2

Hole #3: We played this in the blue placement. Righties, beware of the road that runs down the left of the fairway, it’s OB! Scores: Emily 5, Adam 4

Hole #4: We played this hole in the blue placement. The fairway is gently sloped downhill. When the pin is in the red placement, water may come into play. Scores: Emily 7, Adam 3

Hole #5: We played this in the red placement. Scores: Emily 4, Adam 5

Hole #6: Based on the pictures I took, I can’t remember which placement this hole was in. Tee for this hole is right up next to the edge of the pond, whose width will vary depending on rainfall. I didn’t quite have the distance or confidence to go across, so I played around it. The top center picture shows the view from the pad. The far right picture looks back at the pad from across the pond. The picture across the bottom shows the length of the pond; you can see the tee pad on the left. Scores: Emily 7, Adam 4

Hole #7: We played this in the red placement. I didn’t get any pictures of this one because I ended up in the water (which shouldn’t typically happen for lefties, but I kept griplocking REALLY badly). Water will come into play though for right-handed hyzer shots if they go too long. Scores: Emily 5, Adam 3

Hole #8: We played this in the red placement. Scores: Emily 6, Adam 3

Hole #9: We played this in the red placement. The fairway is slightly downhill overall, with a drainage creek running across it. There is a cluster of skinny trees surrounding the tee pad, and a few larger evergreens guarding the basket. Scores: Emily 5, Adam 4

Hole #10: We played this in the blue placement. The big tree on the tee sign that used to be in the fairway is gone. It previously played as a mando, so the shot to the basket is significantly more open than it has been in the past. Scores: Emily 5, Adam 3

Hole #11: We played this in the blue placement. The fairway curves to the left for both placements. The green slopes down then back up, creating a bit of a valley. Scores: Emily 5, Adam 5

Hole #12: We played this in the red placement. The right side of the fairway is lined with trees; the left side is relatively open. The basket is within the treeline on the right, and is surrounded by trees on 3 sides. Scores: Emily 6, Adam 3

Hole #13: We played this in the red placement. The road on the right is OB. You can see that it is roped off on the edge of the pictures; the ropes are a few feet from the edge of the road. Scores: Emily 4, Adam 3

Hole #14: We played this in the red placement. The basket is tucked between two evergreen trees, and behind a smaller tree. Scores: Emily 3, Adam 3

Hole #15: We played this in the blue placement. The road on the right of the hole is OB. Past the evergreens on the left is wide open, in the event a shot doesn’t land in the fairway. Scores: Emily 5, Adam 3

Hole #16: We played this in the blue placement. I didn’t get any pictures of this hole because, for me, it was long and frustrating, and Adam’s shot didn’t turn over and landed in someone’s yard across the road. Whoops! Scores: Emily 9, Adam 3

Hole #17: We played this in the red placement. There is OB on both sides of the fairway (road on the right, houses on the left). Water comes into play for the blue placement, but not the red. Scores: Emily 5, Adam 3

Hole #18: We played this in a special placement that is usually used for Hole #1; it goes all the way across the pond and rests on the edge instead of being on the left side of it, as is seen in the red and blue placements. You can see the basket from the tee in the top picture, where it is to the right of the brown trees. The water makes this placement especially difficult. We learned from experience that, if faced with a difficult putt, it is vital to throw a shot that will not roll if it hits the ground. I ended up 50+ feet from the basket more than once on a roll. Also, for the blue placement, it may be important to know that the road is OB behind the tree line. Scores: Emily 11, Adam 4